|
|
|
|
|
|
|
|
|
|
|
|


|
|
||
|
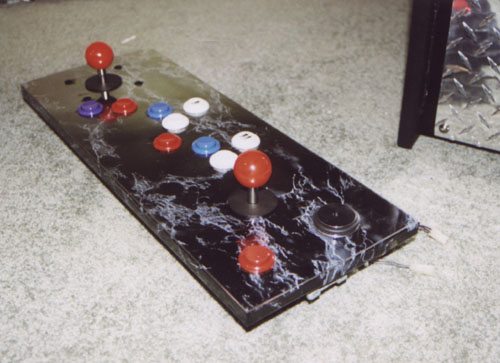
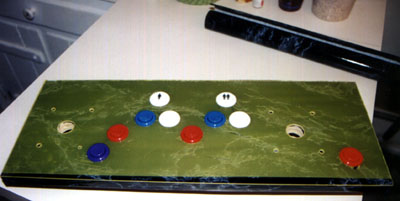
This is the Control Panel for IM Berzerk. There are quite a few things to consider when designing you Control Panel. My main concern was the configuration of the buttons to mimic the more 'Classic' arcade games like Galaxian, Robotron, Front Line, Tempest and such. Many folks out there use the standard Street Fighter setup, but that was not good for what I had in mind. The very few simultaneous two-player games that I own fit the configuration I designed. I also took into account ergonomics. This aspect was considered for Space Invaders, and Asteroids. The center configuration of buttons show Asteroids, Defender, Stargate, and Space Invaders. I left plenty of room to rest the player's wrists on as they were in the original cabinets. In a brief synopsis: the six 'P's' apply here: Proper Planning Prevents Piss-Poor Performance. Panel construction was pretty straight forward. However, planning took a very long time. It is critical that you think and rethink the configuration of the Panel as it will effect how you play certain games. Most late 70's and early 80's games used very simple joystick/button configurations. Most were one button, one joystick set-ups. Games like Donkey Kong, Frogger, Pac-Man (incl Ms. Pac-man), Kangaroo, and the rest were just 1 joystick and a fire button. The games that came out later on were far more complicated with controls and should be considered. My goal was to make a MAME unit that played mostly Classic stuff so I had it easy when it came to the Control Panel. My only problem was the size restriction on the panel. Berzek was 26" wide, but the panel was only 24". Due to the design of the cabinet, I was slightly restricted, but with real good planning, I overcame that. I used templates available on the internet, which helped button spacing and placement tremendously. I used the standard Happ Buttons which are 1 1/8" in diameter so a hole saw was used. 1.
Choice of Wood, Steel or Fiber Board 2.
Planning the Layout 3. Cutting and Drilling
|
||
|
|
||
|
***
Important *** |
||
|
|
||